Credit Affordability
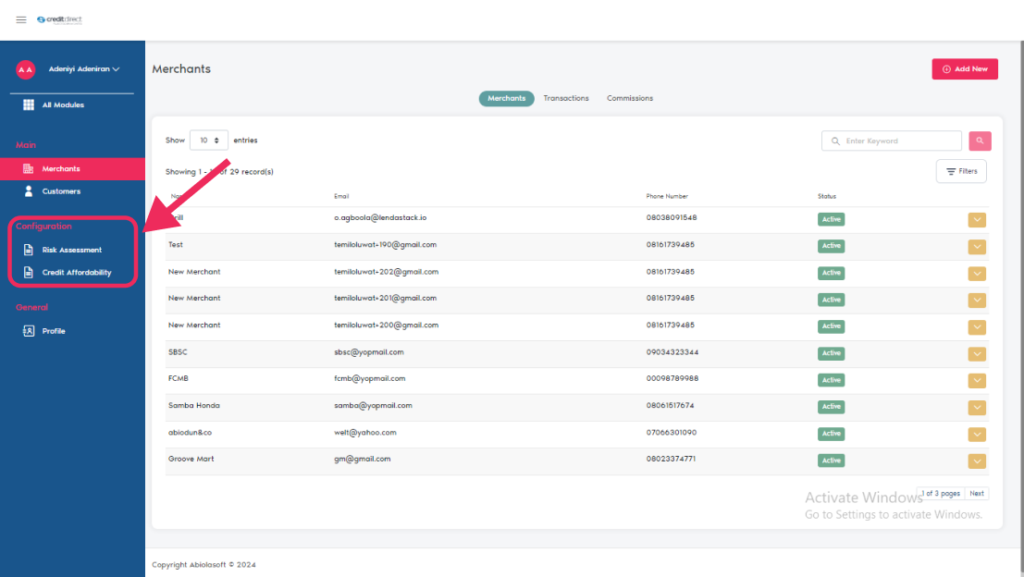
Once you login into Lenda click on checkout module, navigate to the “Configuration” section on the sidebar where we have two engines.
1, Credit Affordability
2, Risk Assessment
Credit Affordability
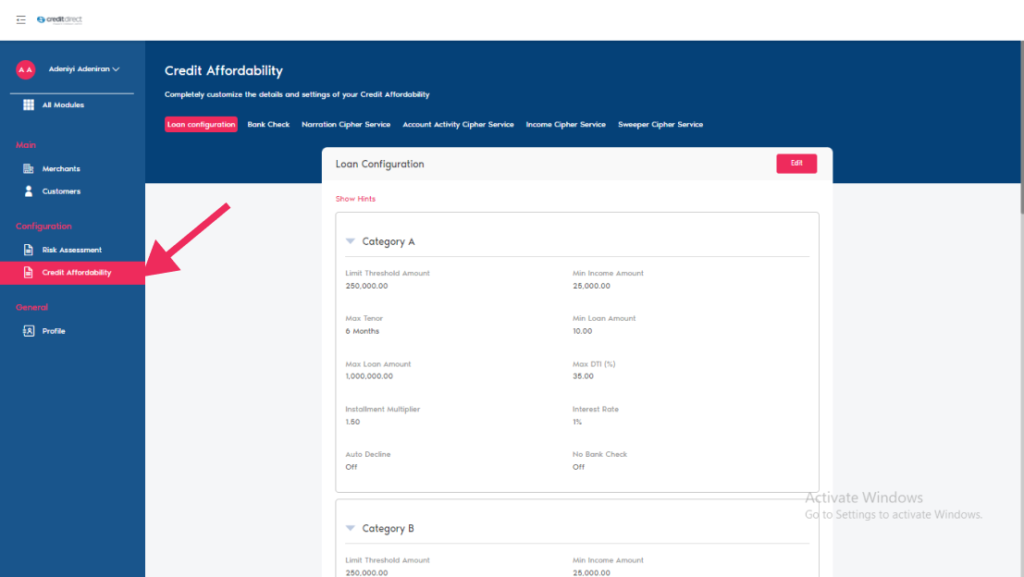
Completely customize the details and settings of your Credit Affordability
Loan configuration
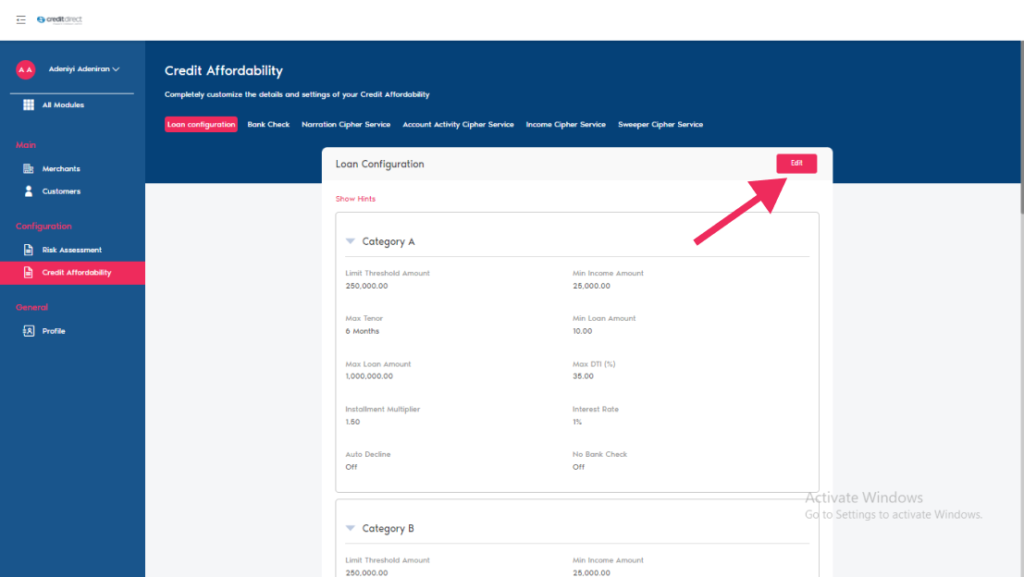
Click on loan configuration this action pops up a modal, where you can configure you loan with the requirement provided below.
Auto Decline toggle: This configuration will allow users to enable or disable automatic decline for any loan categories (A, B, C, D, E).
No Bank Check toggle: This configuration will allow users to enable or disable bank check for any loan categories (A, B, C, D, E).
Limit Threshold Amount: Define the maximum allowable loan amount across all categories.
Min Income Amount: This sets the period in months which is how far back in the bank statement should the transaction search be for
Max Tenor (months): Users can set the maximum loan tenor (repayment period) in months by category that all loan limits will be generated by.
Min Loan Amount: This configuration will allow users to define the minimum loan amount allowed per category.
Max Loan Amount: This configuration will allow users to define the maximum loan amount allowed per category.
Max DTI % (Debt-to-income): This configuration will allow users to set a maximum allowable Debt-to-Income ratio per category.
Installment Multiplier (%) (on the installment inclusive of interest): This configuration will allow users to set a multiplier factor used in the determination of a loan application.
Interest Rate (%): Users can set the interest rate for loan calculations per category.
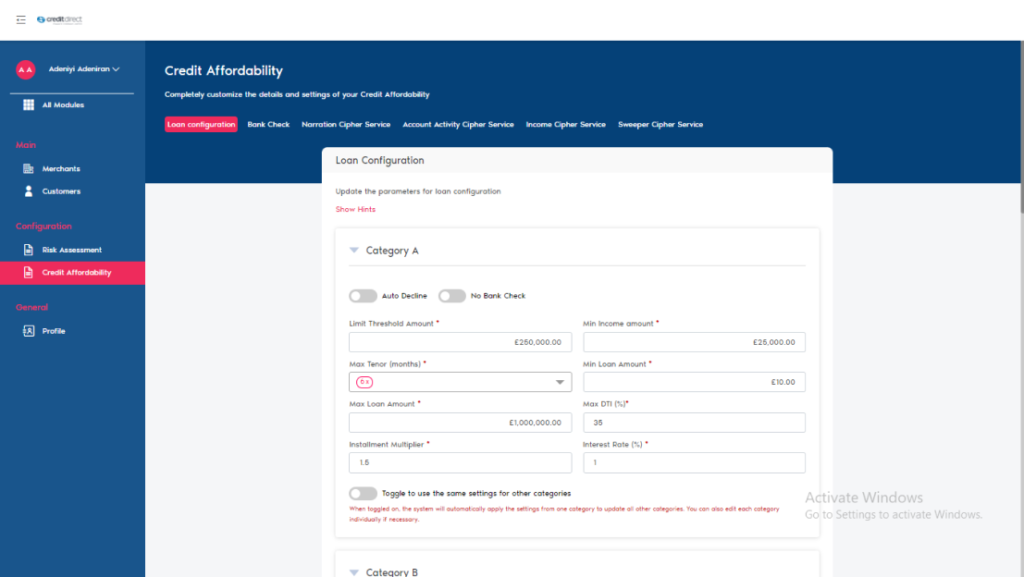
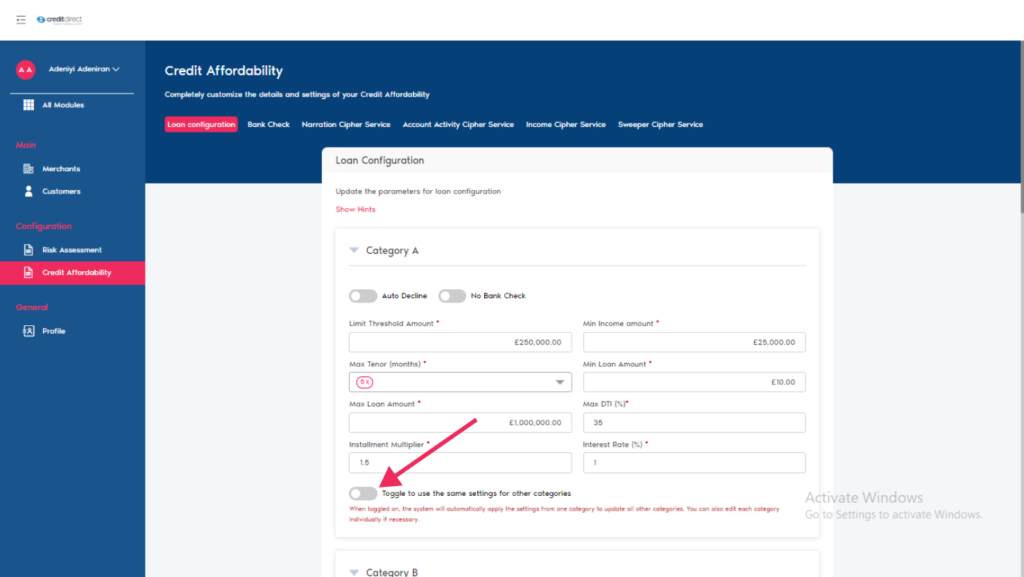
After all that is required is set you will notice the last toggle button at the bottom of the modal
This toggle grant you access to use the same settings for other categories
When toggled on, the system will automatically apply the settings from one category to update all other categories. You can also edit each category individually if necessary.
Bank Check
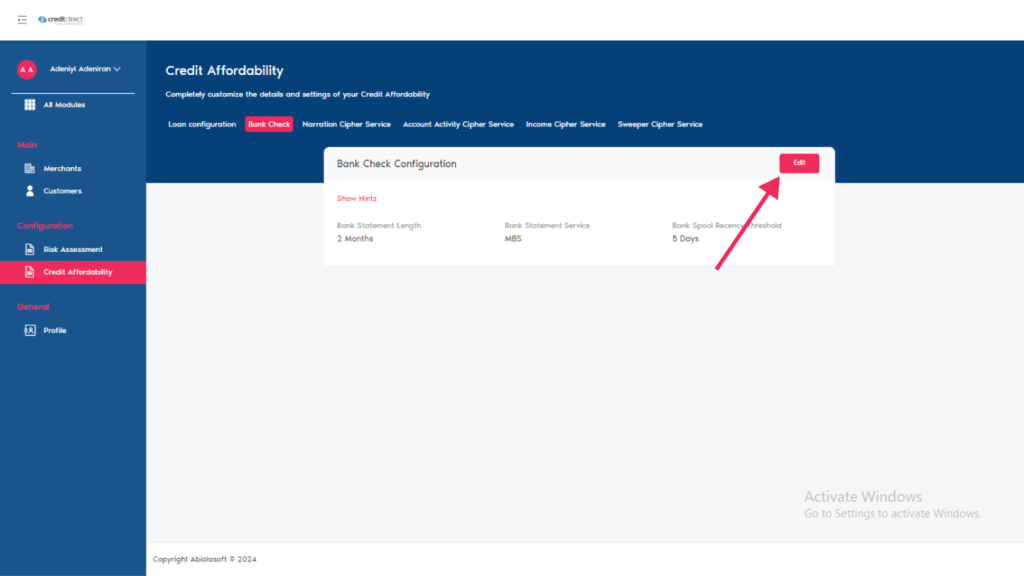
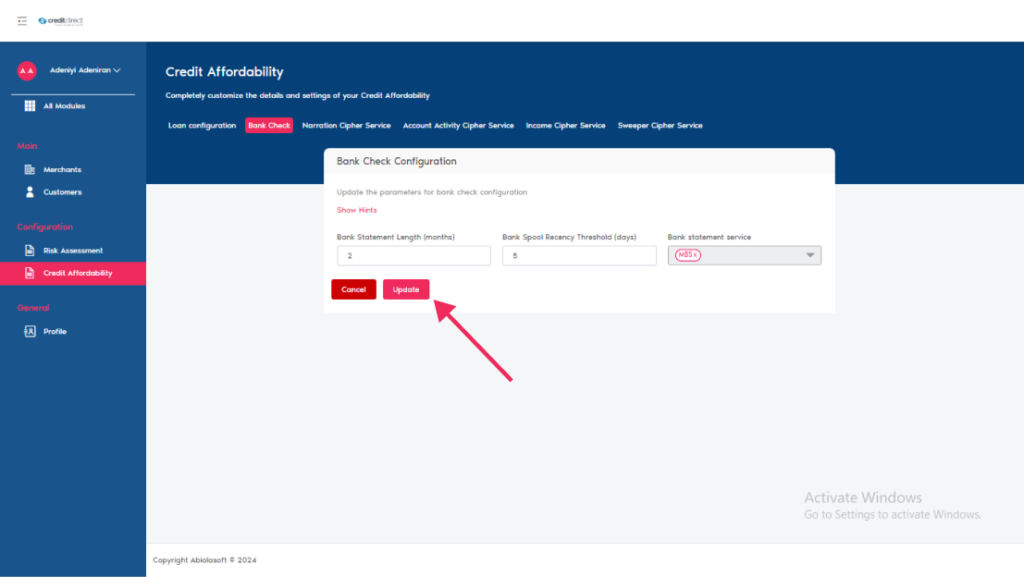
Once you click on Bank Check this action pops up a modal, click on edit on the top right Coner of the modal set the desired information as follow
Bank Statement Length: This configuration allows users to set the length of the bank statements to be considered during the assessment.
Bank Statement Service: This configuration allows user to specify or set to default the service that will be used to extract bank statements.
Bank Statement Length / Bank Spool Recency Threshold / Bank Statement Service
6 Months 8 Days MBS
Once all information is inputted click on the update button to save settings.
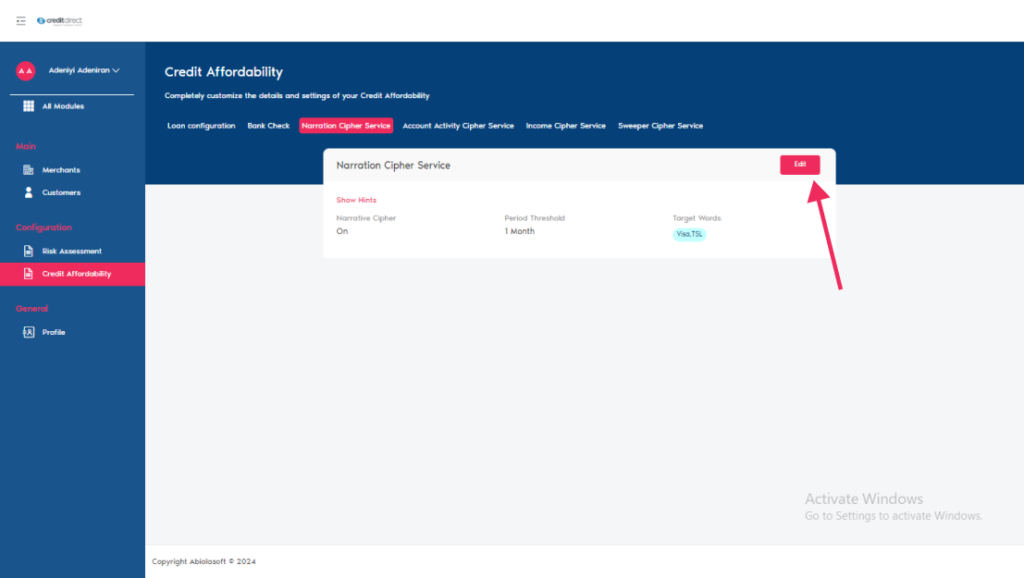
Narration Cipher Service
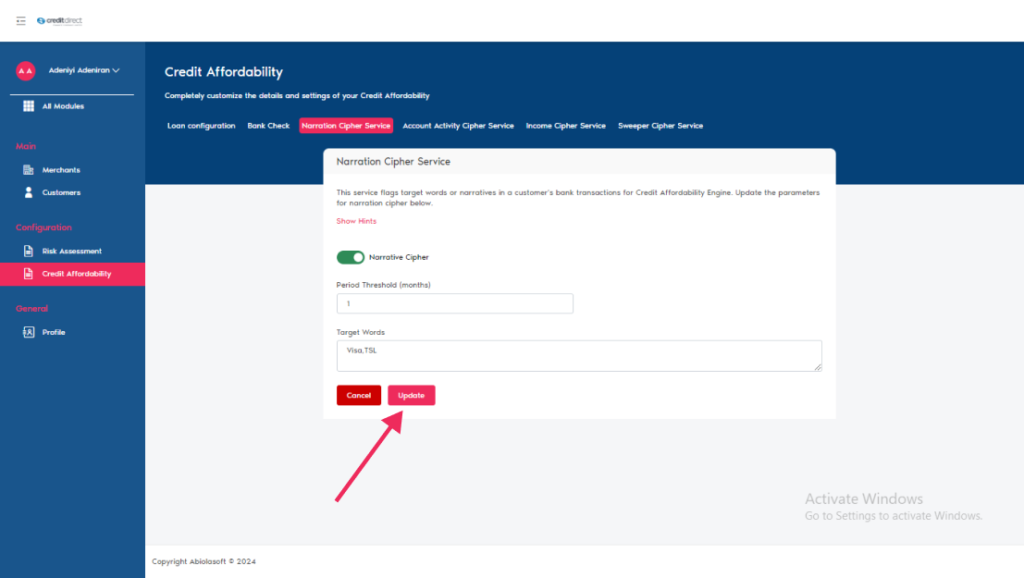
Once you click on Narration Chiper Service this action pops up a modal, click on edit on the top right Corner of the modal set the desired information as follow
This service flags target words or narratives in a customer’s bank transactions for Credit Affordability Engine. See how to update the parameters for narration cipher below.
Narrative Cipher: you will notice a toggle that can be turned both ways, this indicates if the narration service should be applied or not.
Period Threshold: This defines the time frame, in months, for searching transactions within the bank statement.
Target Words: These are the words in the search criteria that if found results in a FAIL of the Narration Cipher service.
Once all information is inputted click on the update button to save settings
Account Activity Cipher Service
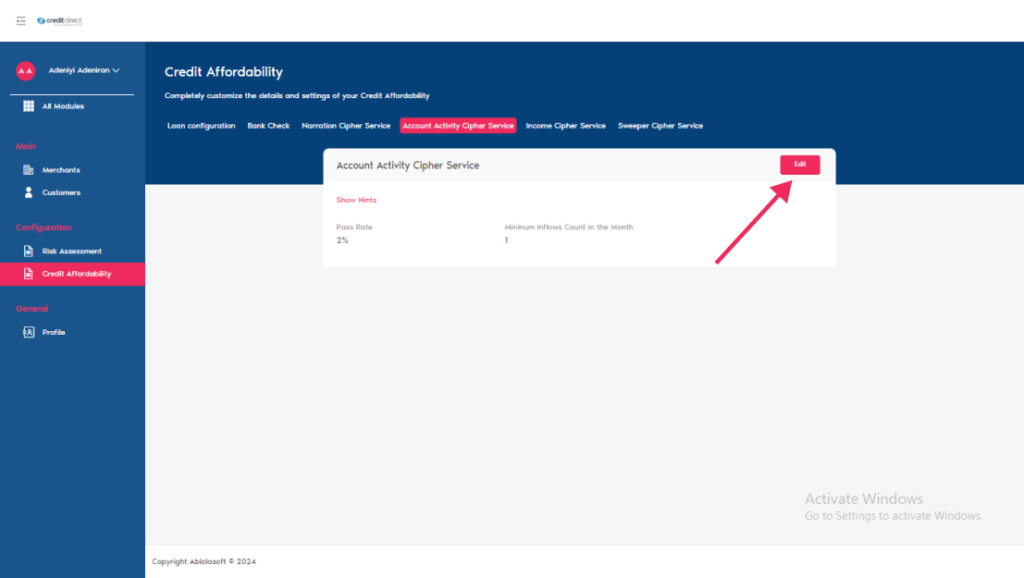
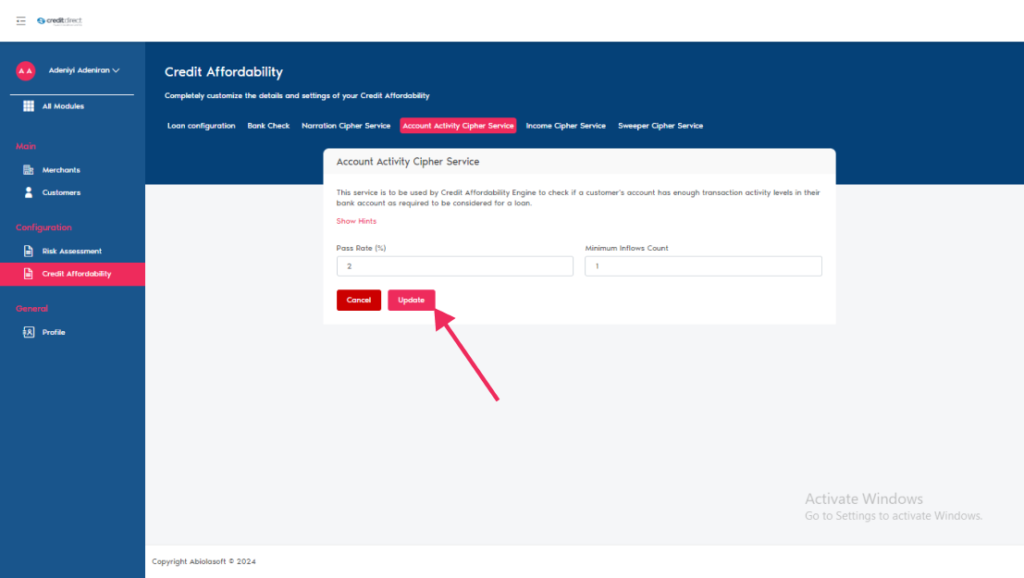
This service is to be used by the Credit Affordability Engine to check if a customer’s account has enough transaction activity levels in their bank account as required to be considered for a loan.
Once you click on Account Activity Chiper Service this action pops up a modal, click on edit button on the top right Corner of the modal to set the desired information as follow
Pass Rate: This configuration sets a threshold for the account activity pass-rate.
Minimum Inflows Count: This configuration defines the minimum number of valid credit transactions that should be in each month on a customer’s bank statement.
Once all information is inputted click on the update button to save settings.
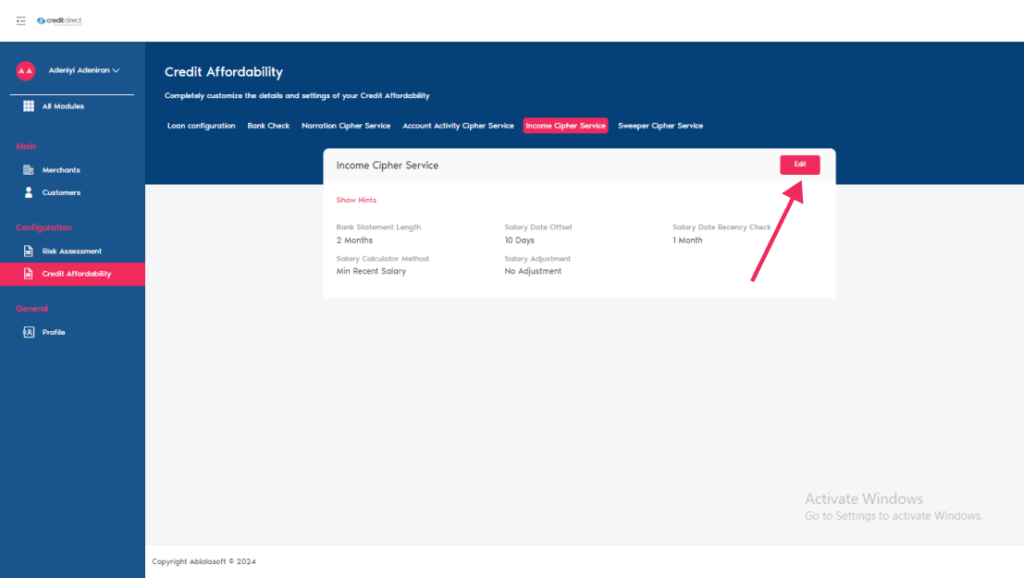
Income Cipher Service
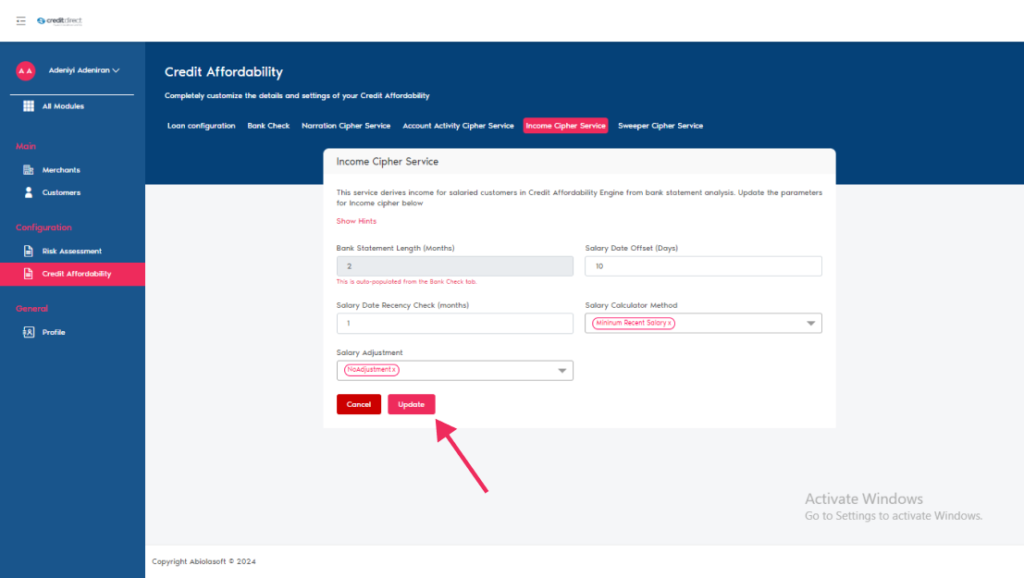
This service derives income for salaried customers in Credit Affordability Engine from bank statement analysis.
Once you click on Income Chiper Service this action pops up a modal, click on edit on the top right Corner of the modal to update the parameters for Income cipher below
Bank Statement Length: This configuration defines the length of bank statements to be spooled based on the customer’s category. Eg- 2 month
Salary Date Offset Threshold: This parameter allows users to set a range that actual salary payment dates can fluctuate by from the actual Expected salary date
Salary Adjustment: This configuration provides options for applying an adjustment to the Derived Salary based on either a Flat percentage, or at least up to five percentages based on the confidence Interval score of the loan from Indicina’s bank statement analysis
Salary Date Recency Check: This configuration defines the number of months to be considered for all calculations which will need a number of recent months to be reviewed
Once all information is inputted click on the update button to save settings.
Sweeper Cipher Service
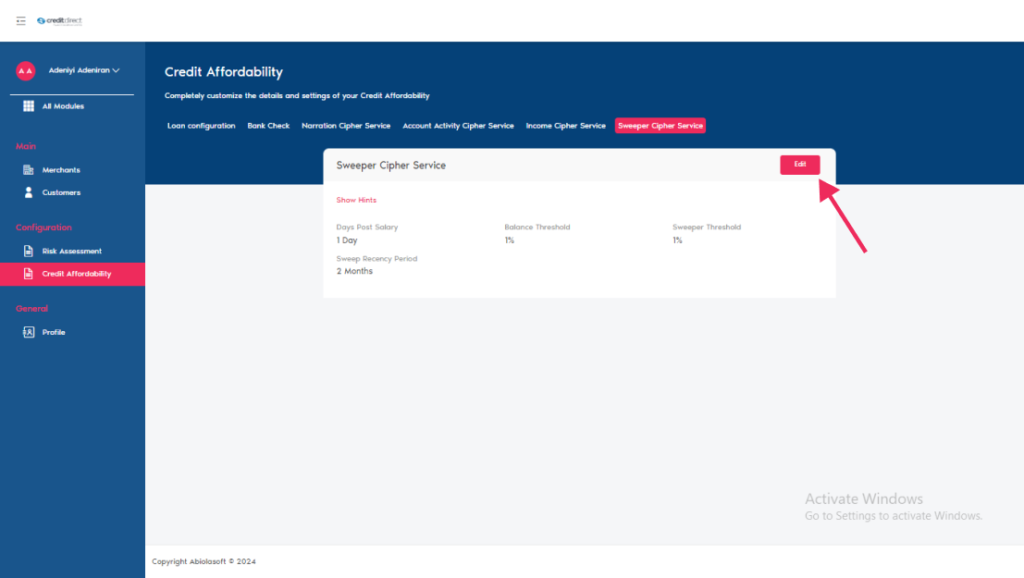
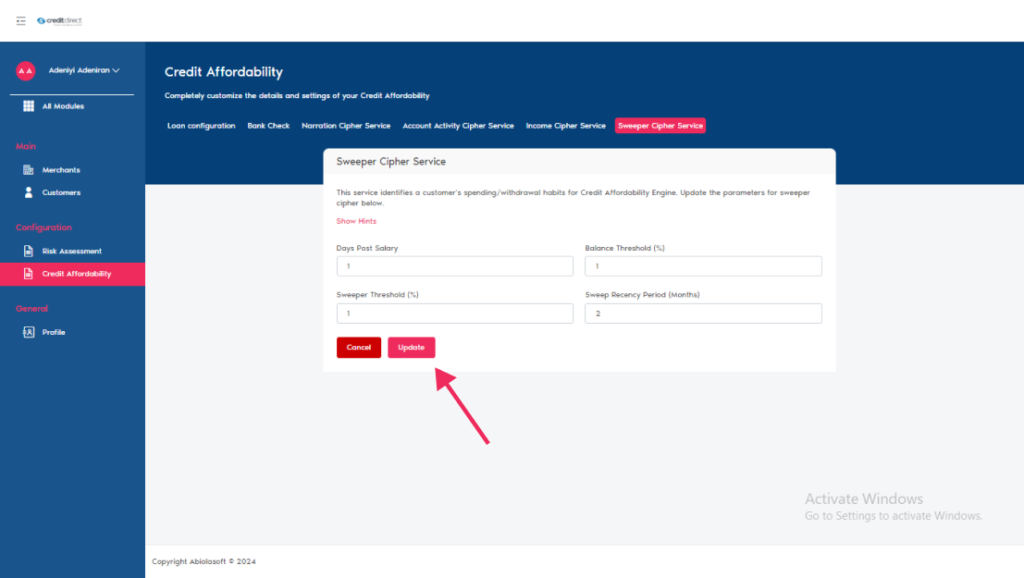
This service identifies a customer’s spending/withdrawal habits for Credit Affordability Engine. Update the parameters for sweeper cipher below.
Days Post Salary: This configuration defines the number of days after the salary date that the system will check a customer’s account balance
Balance Threshold: This configuration defines the percentage of the account balance that should remain after the specified number of days post-salary
Sweeper Threshold: This configuration allows users to set the sweep score threshold between 1 and 100 percent
Sweep Recency Period: This configuration allows users to set the number of months they want to consider for analyzing recent sweep consecutive occurrence
Risk Assessment
This section allows you to completely customize the risk assessment for all customers going through Checkout
On the sidebar click on risk assessment a short data form is displayed with four different headings in which you fill /set all required.
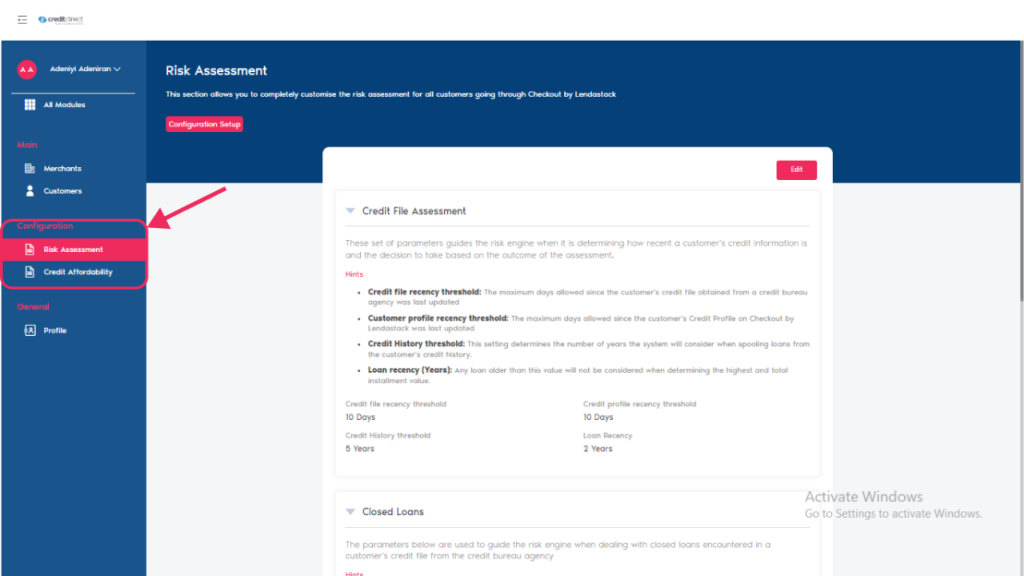
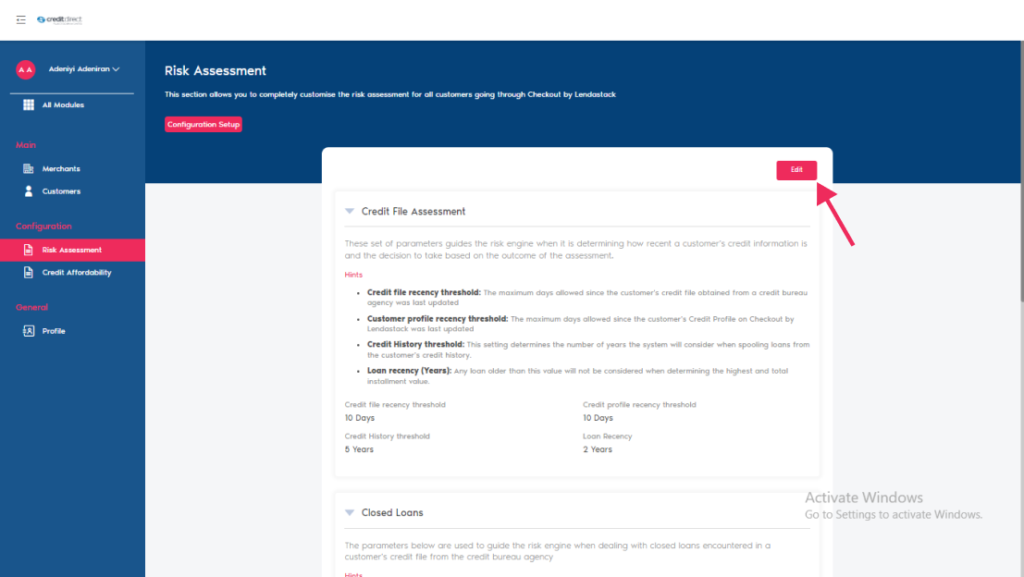
Configure Credit File Assessment
This set of parameters guides the risk engine when it is determining how recent a customer’s credit information is and the decision to take based on the outcome of the assessment.
Once you click on Configure Credit File Assessment this action pops up a modal, update the parameters for Configure Credit File Assessment below
Credit file recency threshold: The maximum days allowed since the customer’s credit file obtained from a credit bureau agency was last updated
Customer profile recency threshold: The maximum days allowed since the customer’s Credit Profile on Checkout by Lendastack was last updated
Credit History threshold: This setting determines the number of years the system will consider when spooling loans from the customer’s credit history.
Loan recency (Years): Any loan older than this value will not be considered when determining the highest and total installment value.

Manage Closed Loans
The parameters below are used to guide the risk engine when dealing with closed loans encountered in a customer’s credit file from the credit bureau agency
Once you click on Manage Closed Loans this action pops up a modal, update the parameters for Manage Closed Loans below,
Closed loan age limit: Closed loan age limit is used to set the maximum age in days that the start date of a closed loan should be to be considered during the customer’s risk assessment. Any closed loan that is older that the limit set in days is not considered during risk assessment

Configure Open Loans Filter
The parameters below are used to guide the risk engine when dealing with open loans encountered in a customer’s credit file from the credit bureau agency
Once you click on Configure Open Loans Filter this action pops up a modal, update the parameters for Configure Open Loans Filter below
Product Name: Type in the name of the product you want to be filtered out of the customer’s credit file.
Product Tenor: Include the tenor iterations of the product name that should not be considered during the customer’s risk assessment.
Product Frequency: Select the relative frequency of the product tenors that will be exempted during the customer’s risk assessment.
You can click on the add filter button at the end of the modal to add more than a roll

Loan Exclusions
This is used to update the loan types to be excluded for this configuration
External KYC Check: Connect to external system for KYC verification by clicking the toggle
Excluded loan products: Enter a comma separated list of loan products (Week, Days, Month) you want to be included in the exception list. Customers who have any of the checked products will be automatically declined from getting a facility through Checkout.
Once you are satisfied with the information provided click on the update button to save settings.

Add A Merchant
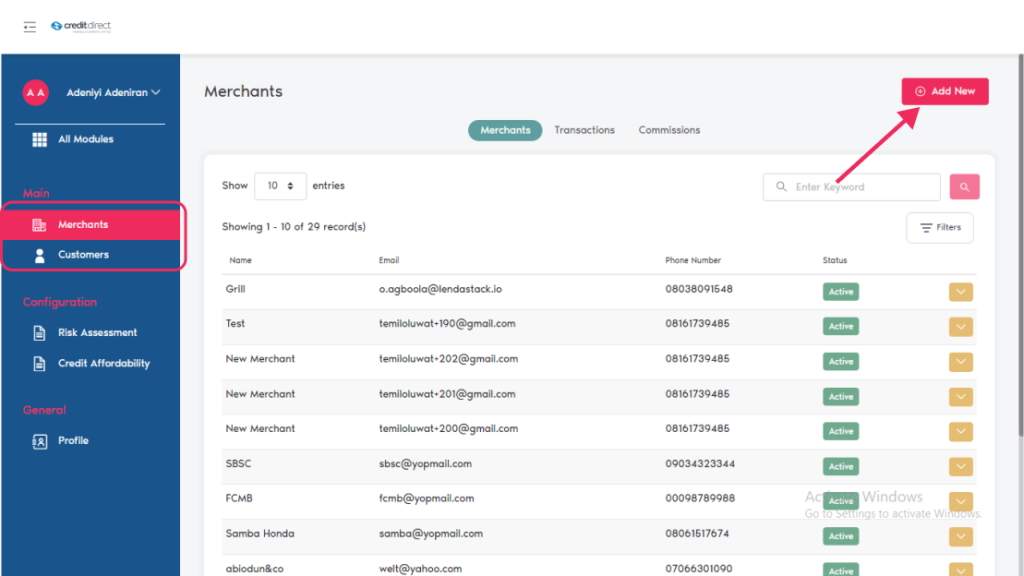
On the side bar scroll up under Main click on Marchant. This is where you add new merchant, View transaction and commission status.
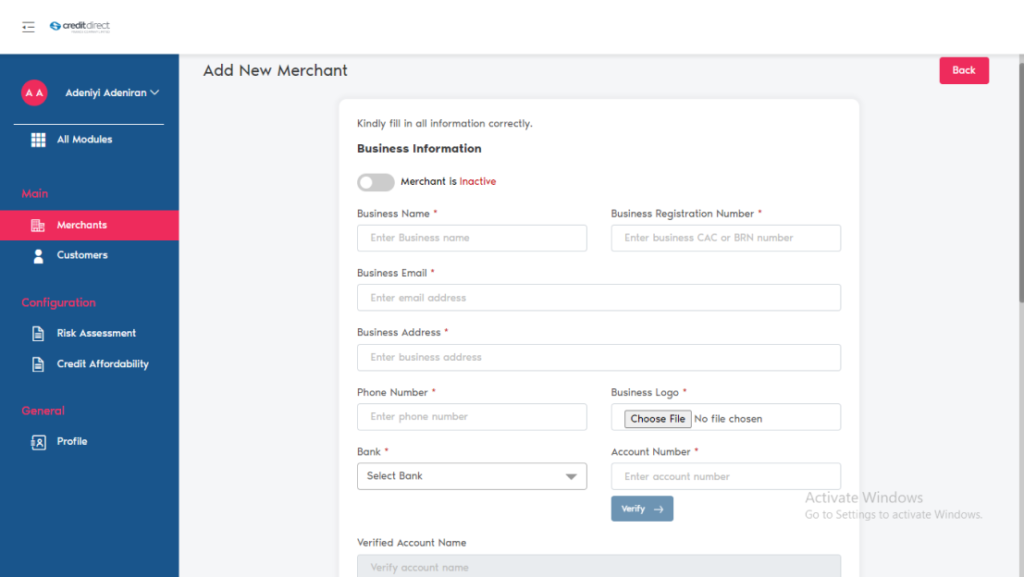
To add a new Marchant, click on the Add New button on the top right corner of the page. A form is displayed in which all basic information about the Marchant that is required (*) fields must be filled.
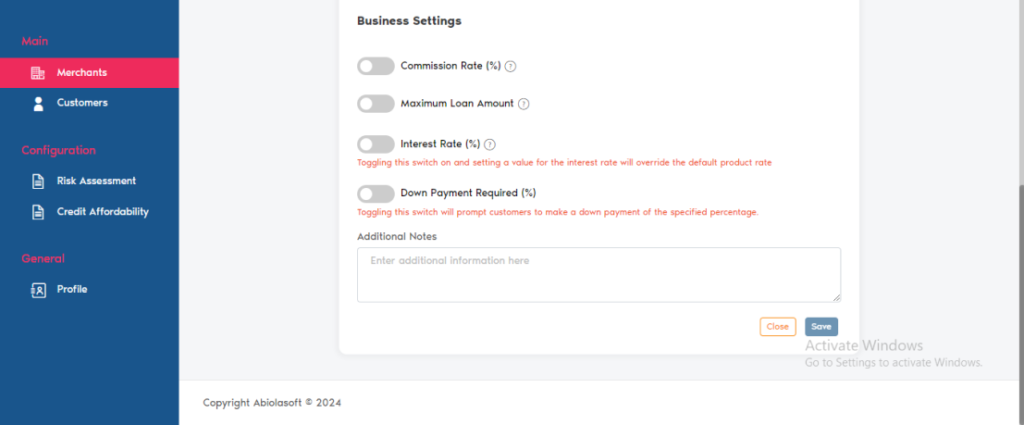
In the same form scroll down to set the business settings
Business Settings
To enable this settings click on the toggle
Commission Rate (%): This setting determines the amount per-transaction that the Marchant is paid as a commission for using check out.
Maximum Loan Amount: this helps to set the amount of financing that can be provided to each customer of the business.
Interest Rate (%): Toggling this switch on and setting a value for the interest rate will override the default product rate.
Toggling this switch on and setting a value for the interest rate will override the default product rate
Down Payment Required (%): Toggling this switch will prompt customers to make a down payment of the specified percentage.
Once you have vet the information provided / settings click on the save button.
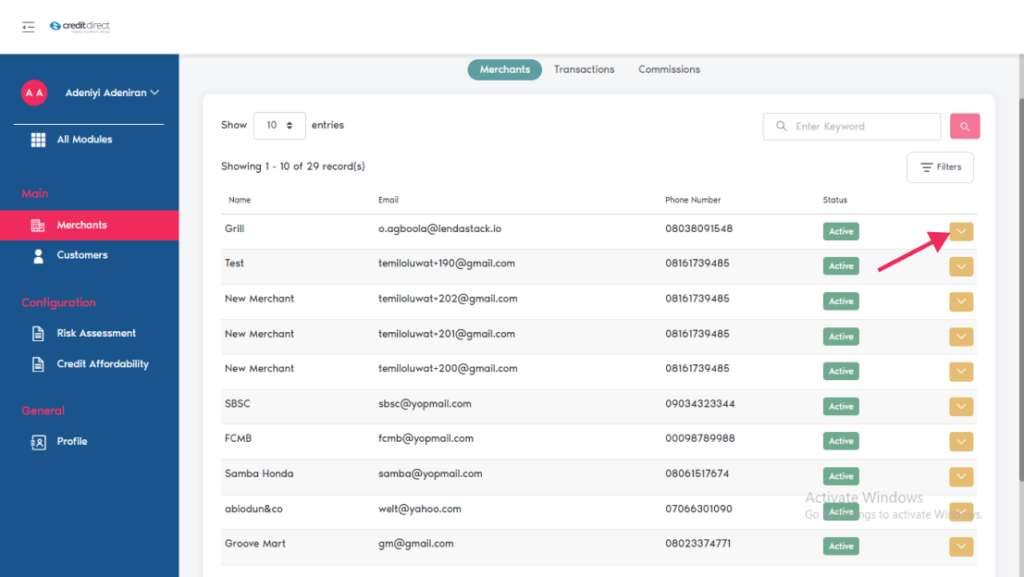
Once the Marchant account has been successfully created the Marchant name / email / phone number / status, will be displayed.
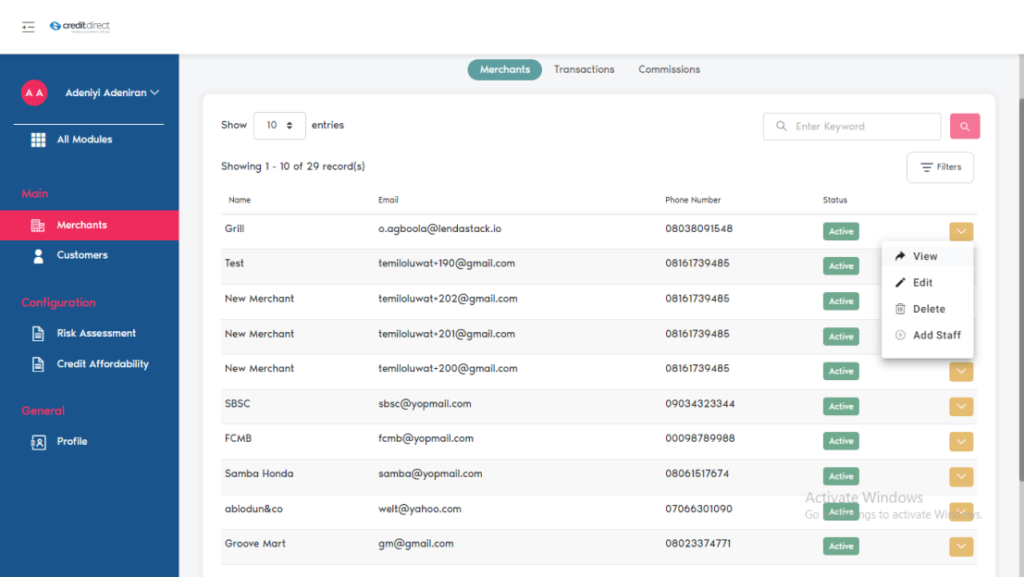
On the right Corner will find and action button that can be used to View/Edit/Delete/Add Staff.
View: The is action is used view information’s on the Marchant profile,
Edit: This action is use when changes need to be made on Marchant’s profile
Delete: This action is used to delete Marchant from checkout by Lendastack
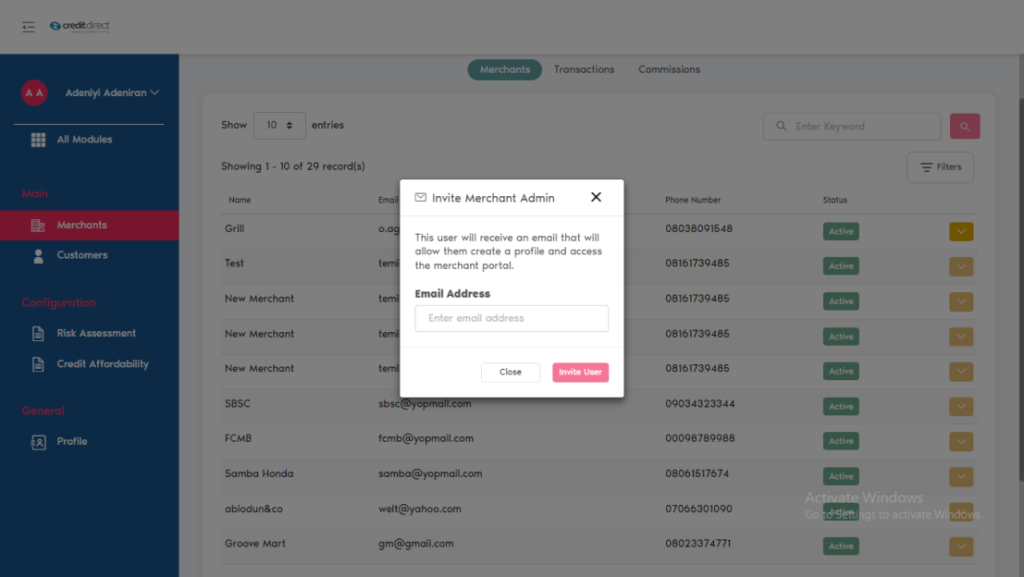
Add staff: click on the “Add Staff “A short form is displayed with the heading “invite merchant” input the staff email address and click on invite user, the user will receive an email that will allow them to create a profile and access the merchant portal.
Transactions
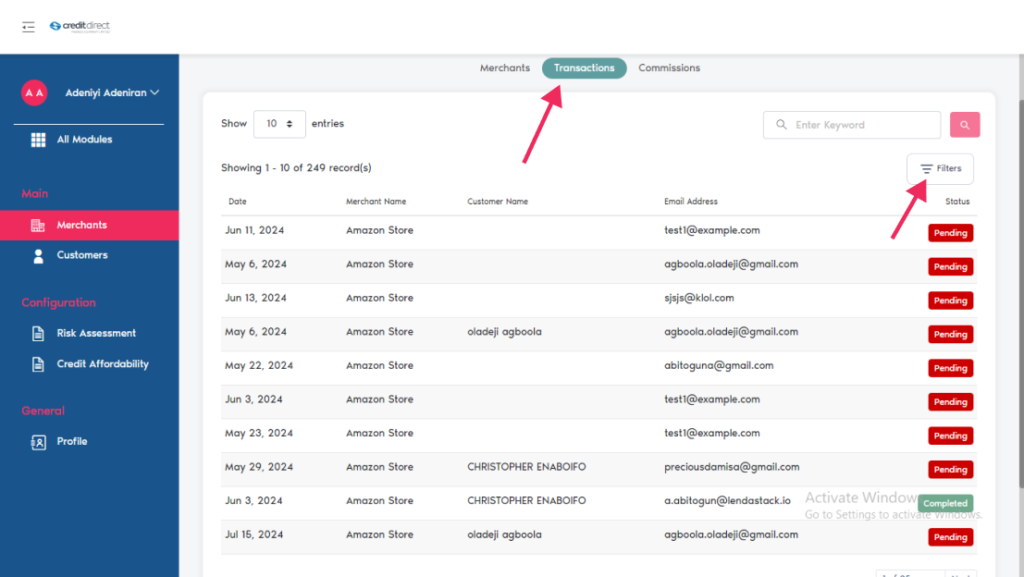
On the Marchant page, clicking on transaction, a page will display with the Date/Marchant name/ customer name / email address /status.
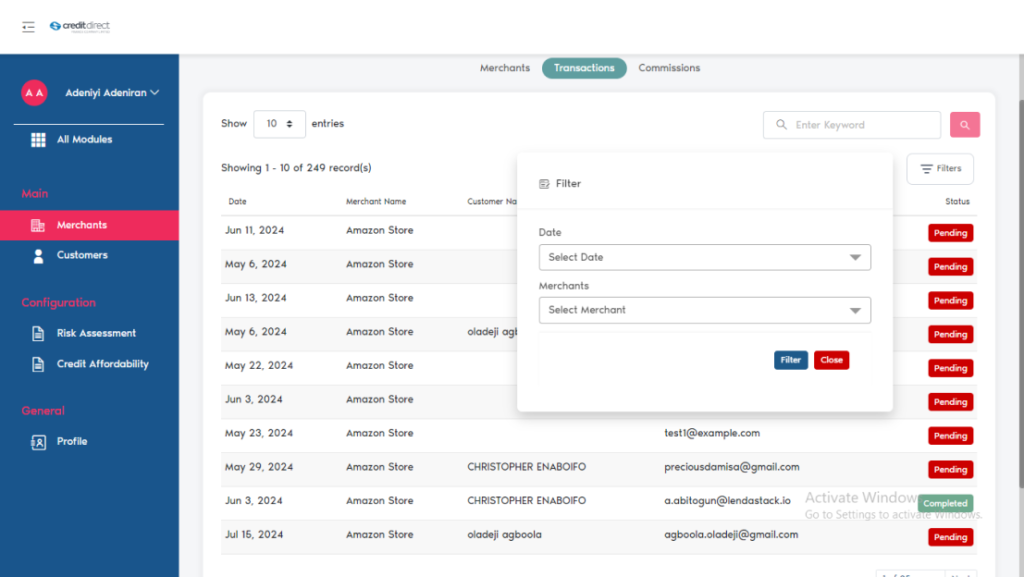
One can filter transactions using the filter button on the right Corner of the screen displayed, using date and Marchant name to filter.
Commissions
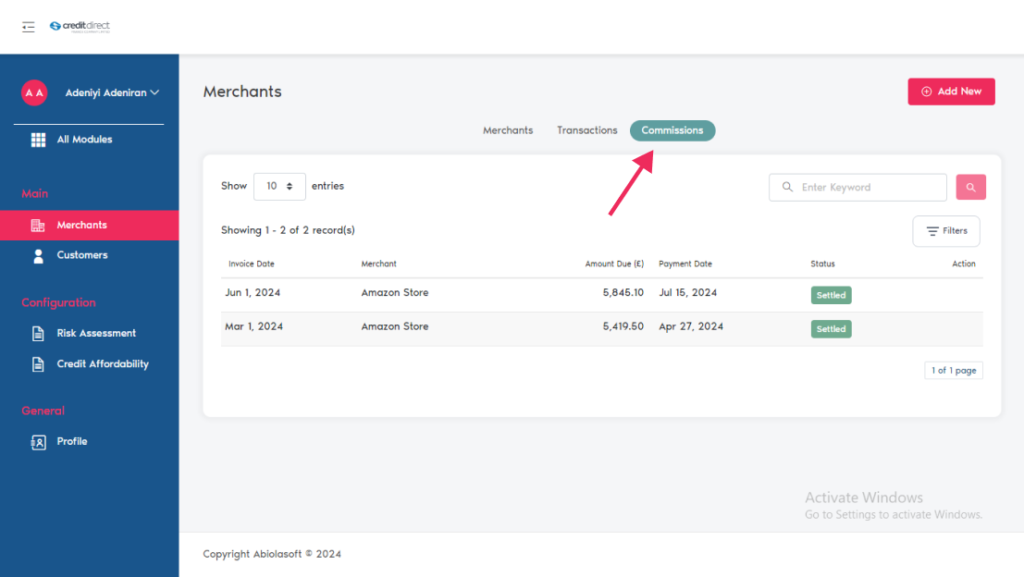
On the Marchant page, clicking on commission, a page will display with Invoice Date/Marchant / Amount Due / payment Date /status/ Action.
This is where you check commissions that have been paid /pending and the date the said payment was initiated.
Customers
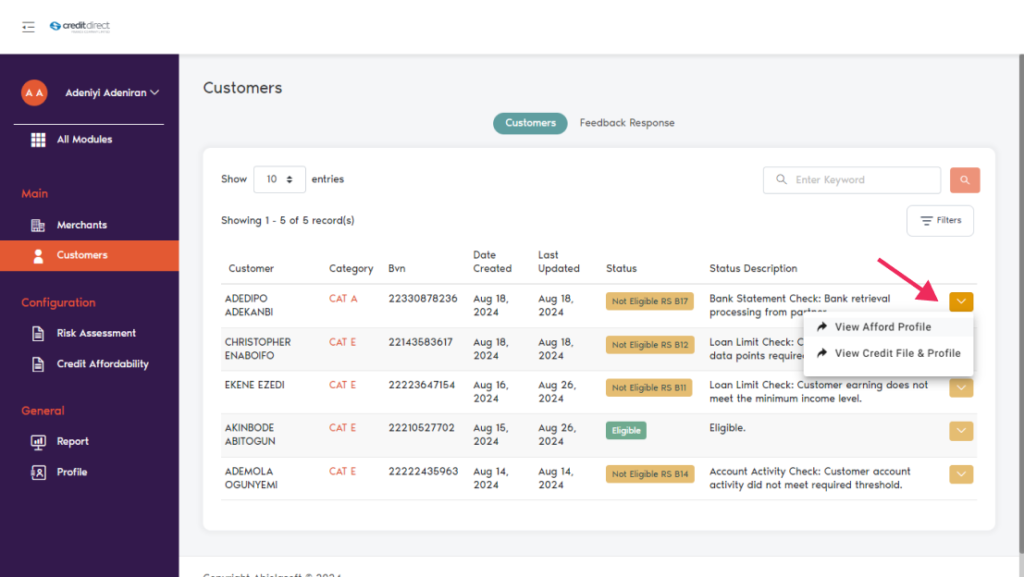
On the side bar, scroll up under Merchant click on “Customers” this brings up a detail page with Customer information’s and Feedback Response.
Click on “Customer” to view customer information’s, e.g. Name, Category, BVN, Date Created, Last Updated, Status, Status Description, one will be able to see all customer information displayed.
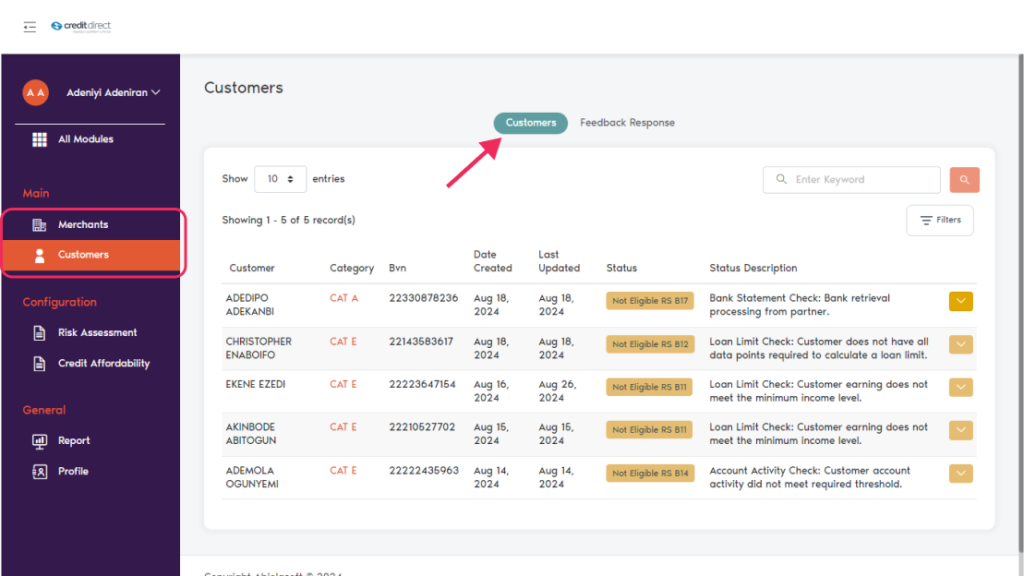
On the customer’s name, right after “Status Description” click on the action button, this brings up two options.
View Afford Profile
View Credit profile
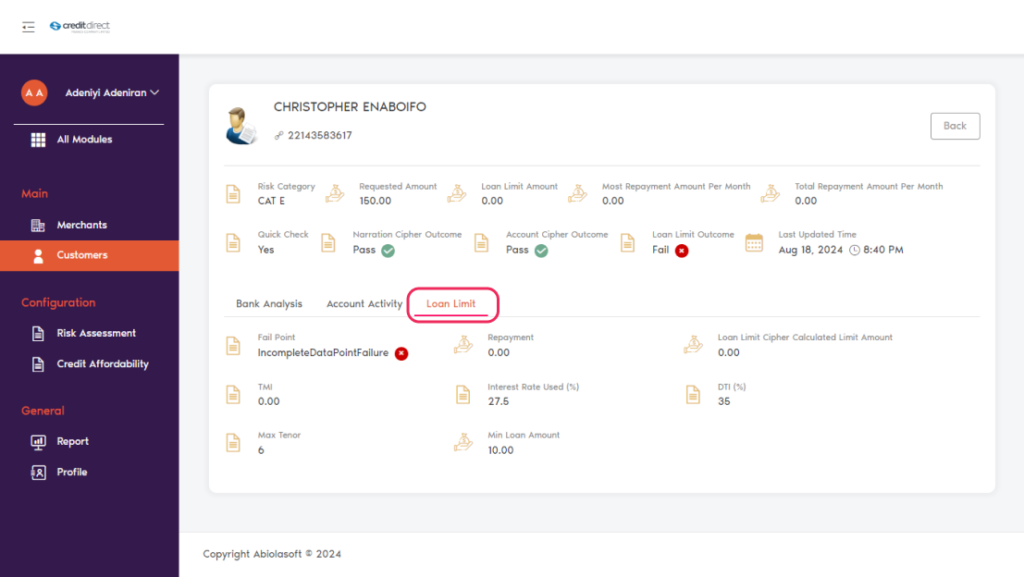
View Afford Profile: Once click on view afford profile, it brings up a page where you can see detail information about the customer, information’s such as
(Risk Category, Requested Amount, Loan Limit Amount, Most Repayment Amount Per Month, Total Repayment Amount Per Month, Quick Check, Narration Cipher Outcome, Account Cipher Outcome, Loan Limit Outcome, Last Updated Time)
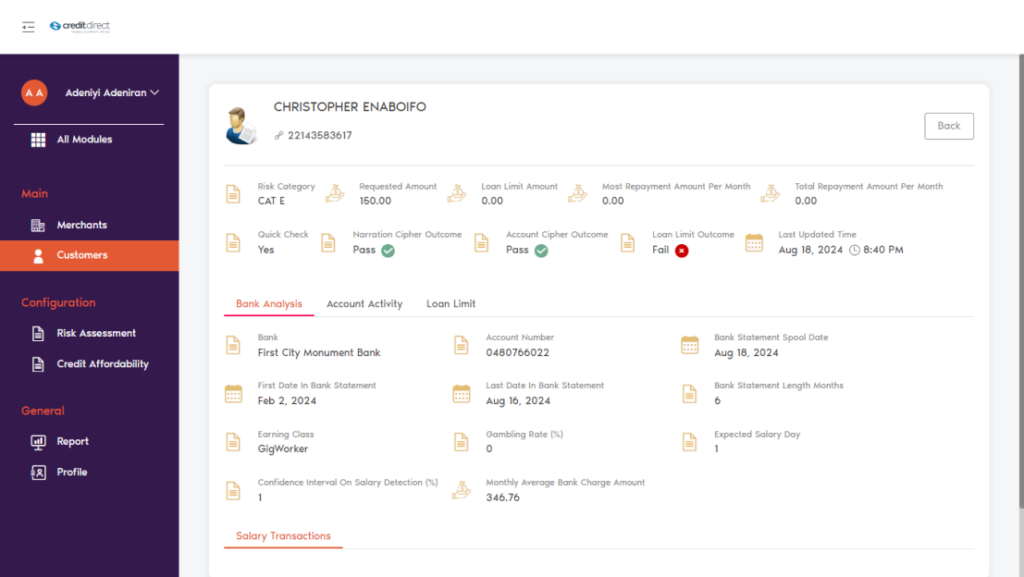
Bank Analysis:
Bank Account Number
Bank Statement Spool Date
First Date in Bank Statement
Last Date in Bank Statement
Bank Statement Length Months
Earning Class, Gambling Rate
Expected Salary Day
Confidence Interval on Salary Detection
Monthly Average Bank Charge Amount
Salary Transactions
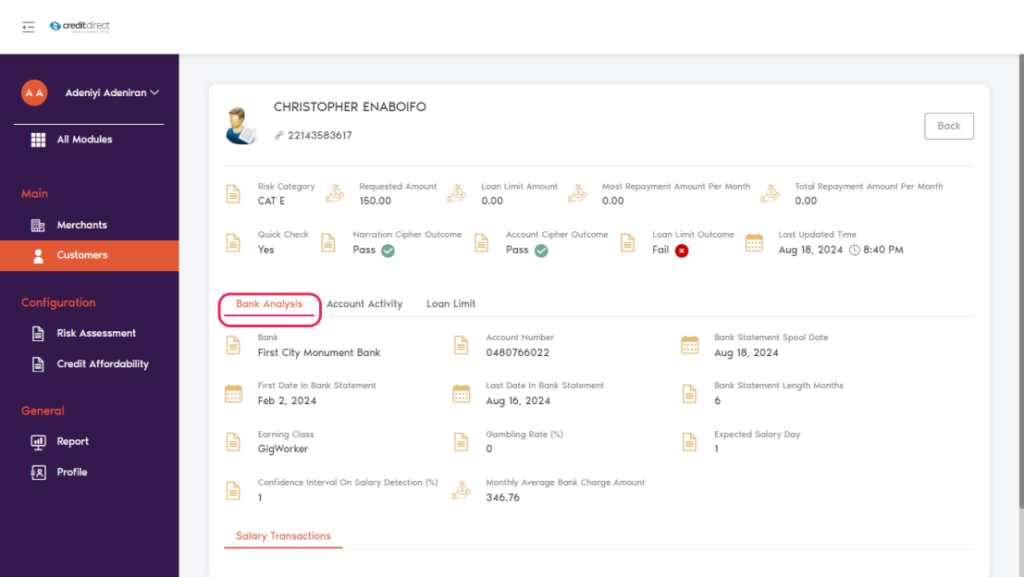
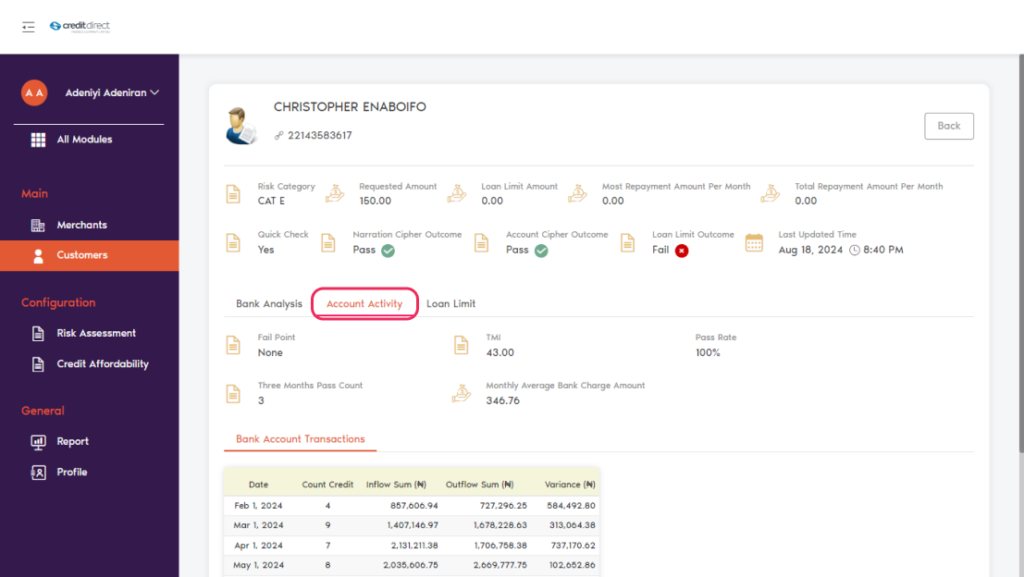
Account Activity:
Fail Point
TMI
Pass Rate
Three Months Pass Count
Monthly Average Bank Charge Amount
Bank Account Transactions
Loan Limit:
Fail Point
Repayment
Loan Limit Cipher Calculated Limit Amount
TMI
Interest Rate Used (%)
DTI (%)
Max Tenor
Min Loan Amount
View Credit profile: Once click on view credit profile, it brings up a page where you can see
Credit files
Credit profile
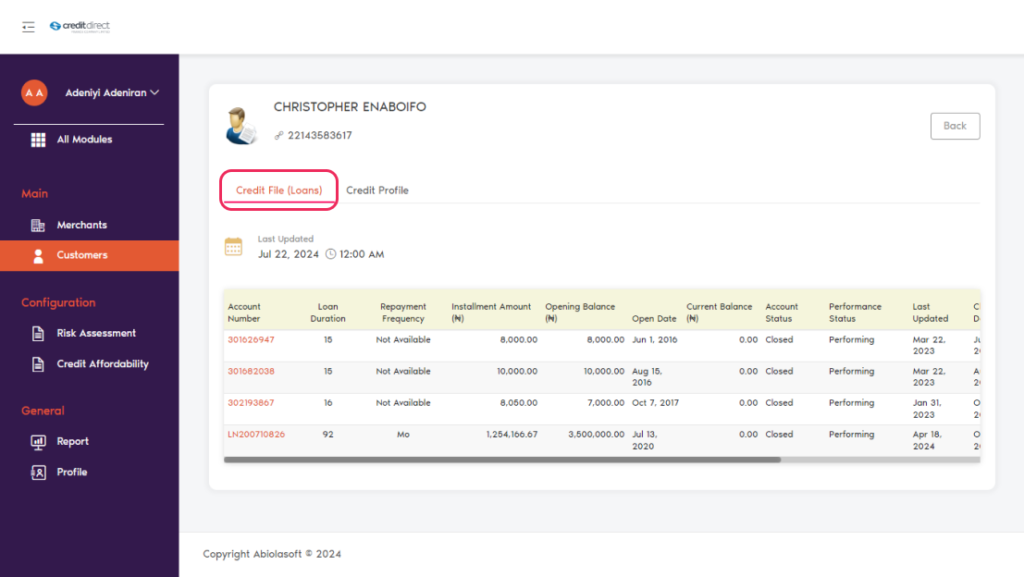
Credit files: Once you click on the credit file, it opens with date and time at the top of the page with a list of information about the customers with a list of sub-headings.
(Account number, Loan Duration, Repayment Frequency, Installment Amount, Opening Balance, Open Date, Current Balance, Account Status, Performance Status, Last Updated, Close Date, Exempted).
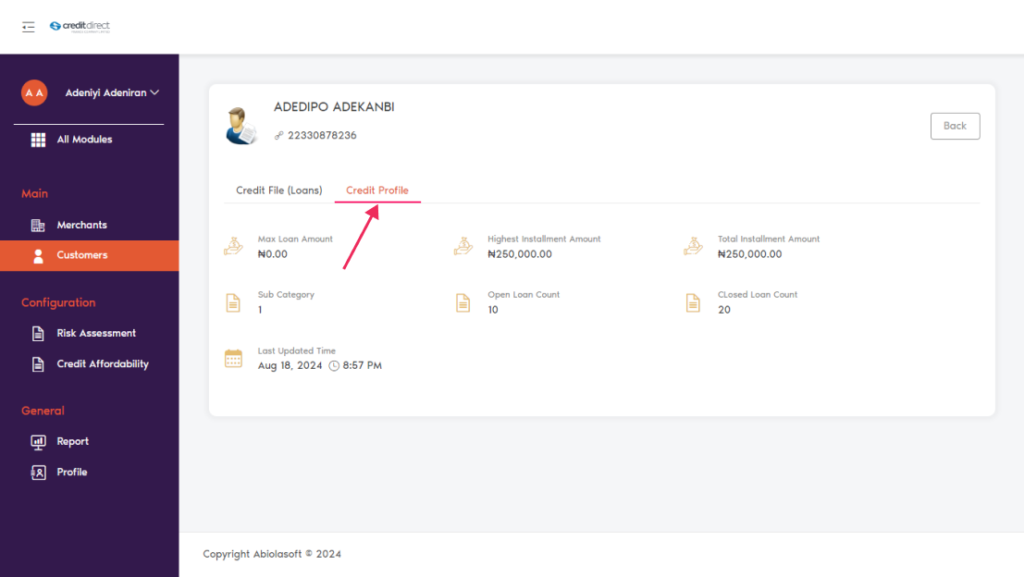
Credit profile: Once you click on the credit profile, it opens with a list of information with a list of sub-headings.
Max Loan Amount
Highest Installment Amount
Total Installment Amount
Subcategory
Open Loan Count
Closed Loan Count
Last Updated Time
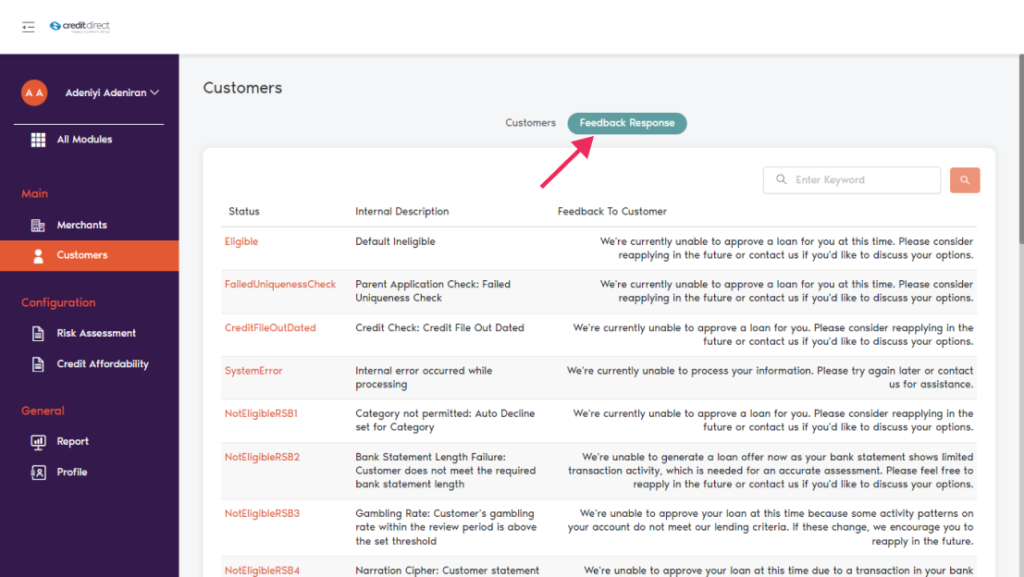
Feedback Response
click on “Feedback Response” this brings up a detailed page with information’s about the customer application.
Status: One will be able to see if the customer was eligible or if an issue arose while creating the application. E.g. system error
Internal Description: internal description of the status of the customer.
Feedback To Customer: you can see messages that were sent to the customers. E.g. We’re unable to approve a loan for you now. Please consider reapplying in the future or contact us if you’d like to discuss your options.
